Custom Page Layouts on the Departmental Website
 You can change the layout and blocks on a page by clicking on the "Layout" link at the top.
When you have finished editing the layout, click the "Save layout" button at the top of the page.
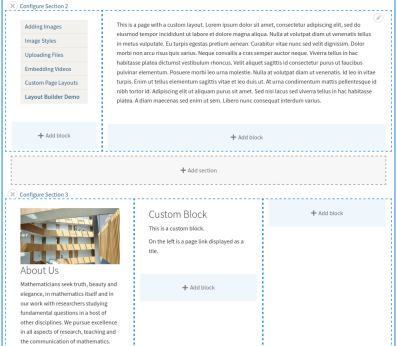
Content Preview
The Layout page gives you a rough preview of how the page will look, but it is not perfect - e.g. the spacing will not match the final page due to the extra borders that are displayed. Remember to check the page displays correctly after you save it.
You can untick "Show content preview" to display the block names instead.
Sections
Each page is divided into multiple sections. You can add and remove sections as needed.
Default Sections
Section 1 - Page Header
In general, you should not modify the first section. By default, that contains:
- Moderation controls (displays the page status - Draft, Review, For deletion - if the page is unpublished)
- Banner images (if any are selected)
- Breadcrumbs (this block is not editable)
- Page title
If you accidentally remove this section, you could immediately click "Discard changes" to undo all changes since your last save (you may lose other recent changes), or click "Revert to defaults" to restore the default two-column layout (any custom blocks will be lost). Alternatively, you could manually re-add each of the blocks, copying the settings for each from another page, or contact IT support for assistance.
Sections 2/3 - Page Content
The second and third sections will depend on the template you used as a starting point:
| Template | Section 2 | Section 3 |
|---|---|---|
| One column | Main content ("Body" field) | N/A |
| Two columns | Menu on the left, and Main content ("Body" field) on the right | N/A |
| Three columns | Main content ("Body" field) | 3 custom content blocks |
| Four columns | Main content ("Body" field) | 4 custom content blocks |
Adding a New Section
To add a new section:
- Click one of the "+ Add section" links that appear below the existing sections.
- Choose the number of columns (from 1 to 4)
- Click the "Add section" button
- Then add one or more blocks to it (see below)
Reordering Sections
Unfortunately, there is currently no way to reorder sections. You will need to create a new section, then drag & drop the blocks to it one-by-one.
Changing the Number of Columns
Unfortunately, there is currently no way to change the number of columns in a section. You will need to create a new section, then drag & drop the blocks to it one-by-one.
Removing a Section
To delete a section and all blocks inside it:
- Click the "X" icon next to the section number
- Click the "Remove" button to confirm
Blocks
Each section/column can contain one or more Blocks. Some of the blocks you can add are:
- Link to other node(s) - Typically used for landing pages
- Menu block - This is the navigation menu that's normally displayed in the left column
- Body - Displays the main page content, typically used in Section 2
- Custom block - Adds another content area that can be edited independently
- Menu pager - Displays Next/Previous page links
Adding a Block
- Click the "+ Add block" link at the bottom of the relevant section
- Select the block type
- Configure the block as needed
- Click the "Add block" button
When you have finished editing the layout, click the "Save layout" button at the top of the page.
Moving/Reordering Blocks
To change the order of blocks, or move a block to a different section, just drag & drop them with the mouse.
Remember to click the "Save layout" button at the top of the page when you have finished.
Editing a Block
- Hover the mouse over the block
- Click the pencil icon that appears in the top-right corner
- Click "Configure"
- Make changes as required
- Click "Update"
Deleting a Block
- Hover the mouse over the block
- Click the pencil icon that appears in the top-right corner
- Click "Remove block"
- Click the "Remove" button to confirm

